實作康威的生命遊戲
設計
在深入探討之前,我們必須考慮一些設計選項。
無限宇宙
生命遊戲是在無限宇宙中進行,但我們沒有無限的記憶體和運算能力。要解決這個相當惱人的限制,通常有下列三種方法
-
追蹤宇宙中哪個子集合有發生有趣的事,並在需要時擴充這個區域。最糟糕的情況是,這種擴充是無限的,且實作會越來越慢,最後用盡記憶體。
-
建立一個大小固定的宇宙,其中邊緣的儲存格比中間的儲存格有較少的鄰居。這種方法的缺點是無限型態(例如滑翔機)在到達宇宙盡頭時會被撲滅。
-
建立一個大小固定、有週期的宇宙,其中邊緣的儲存格有鄰居環繞至宇宙的另一邊。由於鄰居會環繞宇宙的邊緣,因此滑翔機可以持續無限運作。
我們將實作第三個選項。
Rust 與 JavaScript 的介面
⚡ 這是本教學中最重要的概念之一,請務必了解並銘記於心!
JavaScript 的垃圾回收堆積區(配置 Object、Array 和 DOM 節點的地方)不同於我們的 Rust 值所在的 WebAssembly 線性記憶體空間。WebAssembly 目前無法直接存取垃圾回收堆積區(截至 2018 年 4 月,預期會隨著 「介面類型」提議 而改變)。另一方面,JavaScript 可以讀取和寫入 WebAssembly 線性記憶體空間,但只能作為標量值的 ArrayBuffer (u8、i32、f64 等)。WebAssembly 函式也可以接受和傳回標量值。這些是構成所有 WebAssembly 和 JavaScript 溝通的基本建構區塊。
wasm_bindgen 定義了跨越這個邊界處理複合結構的共識。這個作法包括封裝 Rust 結構,並將指標包覆在 JavaScript 類別中以方便使用,或從 Rust 編制 JavaScript 物件的表格索引。wasm_bindgen 非常方便,但並未消除針對我們的資料表述進行考量,以及跨越此邊界的價值和結構的需求。反之,請將其視為協助實作你所選擇介面設計的工具。
在設計 WebAssembly 和 JavaScript 之間的介面時,我們希望針對下列屬性進行最佳化
-
最小化複製進出 WebAssembly 線性記憶體的動作。不必要的複製會造成不必要的負擔。
-
最小化序列化和反序列化的動作。與複製類似,序列化和反序列化也會造成負擔,而且經常也會造成複製。如果我們可以傳遞不透明處理的資料結構(而不是在單方序列化它,將它複製到 WebAssembly 線性記憶體中的某個已知位置,並在另一方反序列化它),我們通常可以減少很多負擔。
wasm_bindgen能協助我們定義不透明處理的 JavaScriptObject或封裝的 Rust 結構,並進行處理。
根據通則,良好的 JavaScript↔WebAssembly 介面設計通常是將大型、長時間存在的資料結構實作為存在 WebAssembly 線性記憶體中的 Rust 型別,並以不透明處理的形式公開為 JavaScript。JavaScript 會呼叫已匯出的 WebAssembly 函式,該函式會取得這些不透明處理,轉換它們的資料,執行大量運算,查詢資料,並最終傳回一個小型、可複製的結果。透過只傳回運算的少量結果,我們可以避免在 JavaScript 垃圾回收堆積區和 WebAssembly 線性記憶體之間來回複製和/或序列化所有內容。
在我們的 Game of Life 中介接 Rust 和 JavaScript
讓我們從列舉一些需要避免的危害開始著手。我們不希望在每次滴答時將整個宇宙複製進出 WebAssembly 線性記憶體。我們不希望針對宇宙中的每個儲存格配置物件,我們也不希望強制跨邊界呼叫來讀取和寫入每個儲存格。
這些讓我們如何做?我們可以將宇宙表示為存活於 WebAssembly 線性記憶體中的平面陣列,而每個儲存格為一個位元組。0 為死亡儲存格,1 為活著的儲存格。
以下是 4 x 4 宇宙在記憶體中的樣子
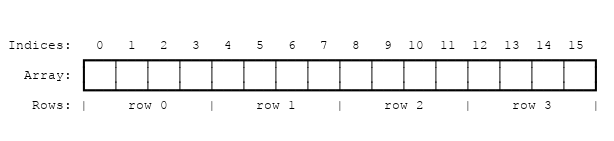
若要找出宇宙中特定列與行中儲存格的陣列索引,我們可以使用此公式
index(row, column, universe) = row * width(universe) + column
有一些方法可以將宇宙的儲存格公開到 JavaScript 中。首先,我們會為 Universe 實作 std::fmt::Display,我們可以使用它產生一個用文字字元呈現儲存格的 Rust String。然後,這個 Rust String 會從 WebAssembly 線性記憶體複製到 JavaScript 在垃圾回收堆中的 JavaScript String,然後設定 HTML textContent 來顯示。稍後,我們會改進此實作以避免複製堆之間的宇宙儲存格,並呈現在 <canvas>。
另一個可行的設計替代方案是讓 Rust 在每一次計時後傳回一個已變更狀態之儲存格的清單,而非將整個宇宙公開到 JavaScript 中。這樣一來,JavaScript 在呈現時就不需要遍歷整個宇宙,而只要遍歷相關子集即可。權衡點是,這種基於增量式變更的設計實作起來會稍微困難一點。
Rust 實作
在前一章,我們複製了一個初始的專案範本。現在,我們要修改那個專案範本。
我們從 wasm-game-of-life/src/lib.rs 中移除 alert 匯入和 greet 函式,並以儲存格的型別定義取代它
# #![allow(unused_variables)]
#fn main() {
#[wasm_bindgen]
#[repr(u8)]
#[derive(Clone, Copy, Debug, PartialEq, Eq)]
pub enum Cell {
    Dead = 0,
    Alive = 1,
}
#}
重要的是必須有 #[repr(u8)],這樣每個儲存格會表示為一個位元組。Dead 變數是 0,Alive 變數是 1 也很重要,這樣我們可以輕鬆地透過加法計算儲存格的存活鄰居數量。
再來,讓我們定義宇宙。宇宙有寬度和高度,以及長度為 寬度 * 高度 的儲存格向量。
# #![allow(unused_variables)]
#fn main() {
#[wasm_bindgen]
pub struct Universe {
    width: u32,
    height: u32,
    cells: Vec<Cell>,
}
#}
若要存取特定列和行中的儲存格,我們會將列和行轉譯成儲存格向量的索引,如前所述
# #![allow(unused_variables)]
#fn main() {
impl Universe {
    fn get_index(&self, row: u32, column: u32) -> usize {
        (row * self.width + column) as usize
    }

    // ...
}
#}
為了計算儲存格的下一狀態,我們需要計算有多少鄰居是存活的。讓我們寫一個 live_neighbor_count 方法來執行此項工作!
# #![allow(unused_variables)]
#fn main() {
impl Universe {
    // ...

    fn live_neighbor_count(&self, row: u32, column: u32) -> u8 {
        let mut count = 0;
        for delta_row in [self.height - 1, 0, 1].iter().cloned() {
            for delta_col in [self.width - 1, 0, 1].iter().cloned() {
                if delta_row == 0 && delta_col == 0 {
                    continue;
                }

                let neighbor_row = (row + delta_row) % self.height;
                let neighbor_col = (column + delta_col) % self.width;
                let idx = self.get_index(neighbor_row, neighbor_col);
                count += self.cells[idx] as u8;
            }
        }
        count
    }
}
#}
live_neighbor_count 方法使用增量和模數來避免使用 if 特別處理宇宙的邊緣。當套用 -1 的增量時,我們會加上 self.height - 1,讓模數發揮作用,而不是嘗試減掉 1。row 和 column 可以為 0,如果我們嘗試從它們中減掉 1,就會發生無符號整數下溢。
現在我們已具備計算下一世代所需的一切!遊戲的每條規則皆可以轉換為 `match` 條件式。另外,由於我們想讓 JavaScript 控制時間刻度,因此將此方法放入 `#[wasm_bindgen]` 區段內,讓 JavaScript 能夠使用。
# #![allow(unused_variables)]
#fn main() {
/// Public methods, exported to JavaScript.
#[wasm_bindgen]
impl Universe {
    pub fn tick(&mut self) {
        let mut next = self.cells.clone();

        for row in 0..self.height {
            for col in 0..self.width {
                let idx = self.get_index(row, col);
                let cell = self.cells[idx];
                let live_neighbors = self.live_neighbor_count(row, col);

                let next_cell = match (cell, live_neighbors) {
                    // Rule 1: Any live cell with fewer than two live neighbours
                    // dies, as if caused by underpopulation.
                    (Cell::Alive, x) if x < 2 => Cell::Dead,
                    // Rule 2: Any live cell with two or three live neighbours
                    // lives on to the next generation.
                    (Cell::Alive, 2) | (Cell::Alive, 3) => Cell::Alive,
                    // Rule 3: Any live cell with more than three live
                    // neighbours dies, as if by overpopulation.
                    (Cell::Alive, x) if x > 3 => Cell::Dead,
                    // Rule 4: Any dead cell with exactly three live neighbours
                    // becomes a live cell, as if by reproduction.
                    (Cell::Dead, 3) => Cell::Alive,
                    // All other cells remain in the same state.
                    (otherwise, _) => otherwise,
                };

                next[idx] = next_cell;
            }
        }

        self.cells = next;
    }

    // ...
}
#}
目前,宇宙狀態表示為一個儲存格向量。為了讓人易於閱讀,我們實作一個基本的文字繪製器。概念是用文字一行一行寫出宇宙,且對於每個活著的儲存格,列印 Unicode 字元 `◼`(「黑色中型方塊」)。對應到死亡的儲存格,我們會列印 `◻`(「白色中型方塊」)。
實作 Rust 標準函式庫內的 Display 特質後,我們可以新增一個方式,將結構以使用者可理解的方式格式化。這也會自動提供一個 to_string 方法。
# #![allow(unused_variables)]
#fn main() {
use std::fmt;

impl fmt::Display for Universe {
    fn fmt(&self, f: &mut fmt::Formatter) -> fmt::Result {
        for line in self.cells.as_slice().chunks(self.width as usize) {
            for &cell in line {
                let symbol = if cell == Cell::Dead { '◻' } else { '◼' };
                write!(f, "{}", symbol)?;
            }
            write!(f, "\n")?;
        }

        Ok(())
    }
}
#}
最後,我們定義一個建構函式,初始化具有活著和死亡儲存格有趣圖樣的宇宙,以及一個 `render` 方法
# #![allow(unused_variables)]
#fn main() {
/// Public methods, exported to JavaScript.
#[wasm_bindgen]
impl Universe {
    // ...

    pub fn new() -> Universe {
        let width = 64;
        let height = 64;

        let cells = (0..width * height)
            .map(|i| {
                if i % 2 == 0 || i % 7 == 0 {
                    Cell::Alive
                } else {
                    Cell::Dead
                }
            })
            .collect();

        Universe {
            width,
            height,
            cells,
        }
    }

    pub fn render(&self) -> String {
        self.to_string()
    }
}
#}
這樣,Rust 端的「生命遊戲」實作就完成了!
在 `wasm-game-of-life` 目錄中執行 `wasm-pack build` 重新編譯為 WebAssembly。
使用 JavaScript 繪製
首先,我們將 `<pre>` 元素新增到 `wasm-game-of-life/www/index.html`,用於繪製宇宙,並放在 `<script>` 標籤的上方
<body>
  <pre id="game-of-life-canvas"></pre>
  <script src="./bootstrap.js"></script>
</body>
另外,我們希望 `<pre>` 置中於網頁中央。我們可以使用 CSS 彈性盒子來達成這個工作。在 `wasm-game-of-life/www/index.html` 的 `<head>` 中新增下列 `<style>` 標籤
<style>
  body {
    position: absolute;
    top: 0;
    left: 0;
    width: 100%;
    height: 100%;
    display: flex;
    flex-direction: column;
    align-items: center;
    justify-content: center;
  }
</style>
在 `wasm-game-of-life/www/index.js` 的最上方,讓我們修正匯入,引入 `Universe`,而不是舊的 `greet` 函式
import { Universe } from "wasm-game-of-life";
再來,讓我們取得剛剛新增的 `<pre>` 元素,並實例化一個新的宇宙
const pre = document.getElementById("game-of-life-canvas");
const universe = Universe.new();
JavaScript 在 `requestAnimationFrame` 迴圈 中執行。在每個反覆運算中,它會將目前的宇宙繪製到 `<pre>`,然後呼叫 `Universe::tick`。
const renderLoop = () => {
  pre.textContent = universe.render();
  universe.tick();

  requestAnimationFrame(renderLoop);
};
若要開始繪製程序,我們只需要針對繪製迴圈的第一個反覆運算進行初始呼叫
requestAnimationFrame(renderLoop);
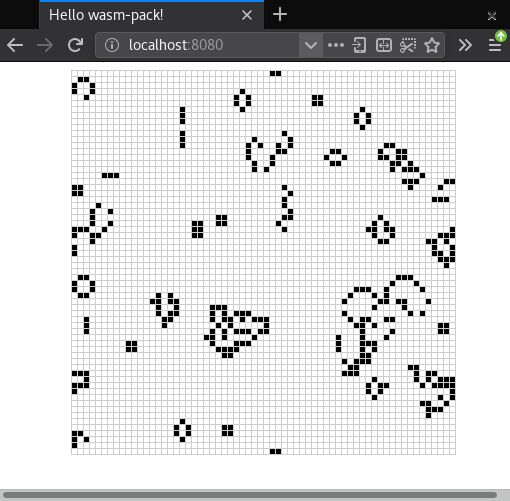
確保您的開發伺服器仍在執行(在 `wasm-game-of-life/www` 內執行 `npm run start`),而 https://#:8080/ 應如下所示
直接從記憶體繪製到畫布
在 Rust 中產生 (並配置) 一個 String,然後讓 wasm-bindgen 將其轉換為有效的 JavaScript 字串會產生宇宙單元的無用副本。由於 JavaScript code 已知宇宙的寬度和高度,且可以直接讀取組成單元的 WebAssembly 線性記憶體,因此我們將修改 render 方法以傳回單元陣列開始的指標。
此外,我們將改為使用 Canvas API 來呈現 Unicode 文字,而非進行渲染。我們將在本教學的其餘部分使用這個設計。
在 wasm-game-of-life/www/index.html 中,讓我們將先前新增的 <pre> 替換為我們將進行渲染的 <canvas>(它也應在 <body> 中,在載入我們 JavaScript 的 <script> 之前)
<body>
  <canvas id="game-of-life-canvas"></canvas>
  <script src='./bootstrap.js'></script>
</body>
為了從 Rust 實作取得必要的資訊,我們需要為宇宙的寬度、高度及其單元陣列指標新增更多 getter 函式。所有這些都會公開给 JavaScript。將這些內容新增至 wasm-game-of-life/src/lib.rs
# #![allow(unused_variables)]
#fn main() {
/// Public methods, exported to JavaScript.
#[wasm_bindgen]
impl Universe {
    // ...

    pub fn width(&self) -> u32 {
        self.width
    }

    pub fn height(&self) -> u32 {
        self.height
    }

    pub fn cells(&self) -> *const Cell {
        self.cells.as_ptr()
    }
}
#}
接著,在 wasm-game-of-life/www/index.js 中,讓我們同時從 wasm-game-of-life 匯入 Cell,並定義一些我們將在渲染到畫布時使用的常數
import { Universe, Cell } from "wasm-game-of-life";

const CELL_SIZE = 5; // px
const GRID_COLOR = "#CCCCCC";
const DEAD_COLOR = "#FFFFFF";
const ALIVE_COLOR = "#000000";
現在,讓我們重新撰寫此 JavaScript code 的其餘部分,不再撰寫到 <pre> 的 textContent,而改為繪製到 <canvas>
// Construct the universe, and get its width and height.
const universe = Universe.new();
const width = universe.width();
const height = universe.height();

// Give the canvas room for all of our cells and a 1px border
// around each of them.
const canvas = document.getElementById("game-of-life-canvas");
canvas.height = (CELL_SIZE + 1) * height + 1;
canvas.width = (CELL_SIZE + 1) * width + 1;

const ctx = canvas.getContext('2d');

const renderLoop = () => {
  universe.tick();

  drawGrid();
  drawCells();

  requestAnimationFrame(renderLoop);
};
若要繪製單元之間的網格,我們繪製一組等距的水平線和一組等距的垂直線。這些線互相交叉形成網格。
const drawGrid = () => {
  ctx.beginPath();
  ctx.strokeStyle = GRID_COLOR;

  // Vertical lines.
  for (let i = 0; i <= width; i++) {
    ctx.moveTo(i * (CELL_SIZE + 1) + 1, 0);
    ctx.lineTo(i * (CELL_SIZE + 1) + 1, (CELL_SIZE + 1) * height + 1);
  }

  // Horizontal lines.
  for (let j = 0; j <= height; j++) {
    ctx.moveTo(0,                           j * (CELL_SIZE + 1) + 1);
    ctx.lineTo((CELL_SIZE + 1) * width + 1, j * (CELL_SIZE + 1) + 1);
  }

  ctx.stroke();
};
możemy 直接透過 memory 存取 WebAssembly 的線性記憶體,它是定義在原始 wasm 模組 wasm_game_of_life_bg 中。若要繪製單元,我們取得宇宙單元的指標,建置一個覆蓋單元緩衝區的 Uint8Array,反覆運算每個單元,並視單元是死亡或存活,繪製白色或黑色矩形。透過使用指標和覆蓋,我們避免在每次滴答時將單元複製到邊界之外。
// Import the WebAssembly memory at the top of the file.
import { memory } from "wasm-game-of-life/wasm_game_of_life_bg";

// ...

const getIndex = (row, column) => {
  return row * width + column;
};

const drawCells = () => {
  const cellsPtr = universe.cells();
  const cells = new Uint8Array(memory.buffer, cellsPtr, width * height);

  ctx.beginPath();

  for (let row = 0; row < height; row++) {
    for (let col = 0; col < width; col++) {
      const idx = getIndex(row, col);

      ctx.fillStyle = cells[idx] === Cell.Dead
        ? DEAD_COLOR
        : ALIVE_COLOR;

      ctx.fillRect(
        col * (CELL_SIZE + 1) + 1,
        row * (CELL_SIZE + 1) + 1,
        CELL_SIZE,
        CELL_SIZE
      );
    }
  }

  ctx.stroke();
};
若要開始渲染程序,我們將使用與上相同 code 開始渲染迴圈的第一個反覆運算
drawGrid();
drawCells();
requestAnimationFrame(renderLoop);
請注意,我們在這裡於呼叫 requestAnimationFrame() 之前 呼叫 drawGrid() 和 drawCells()。我們這樣做的原因是,我們在進行修改之前,繪製宇宙的初始狀態。如果我們改為僅呼叫 requestAnimationFrame(renderLoop),最終會遇到繪製的第一個幀實際上在第一次呼叫 universe.tick()(也就是這些單元的生命中的第二次「滴答」)之後 的情況。
成功了!
透過從根目錄 wasm-game-of-life 執行此命令重新建置 WebAssembly 和約束連結
wasm-pack build
請確定你的開發伺服器仍在執行中。如果沒有,請從 wasm-game-of-life/www 目錄中重新啟動
npm run start
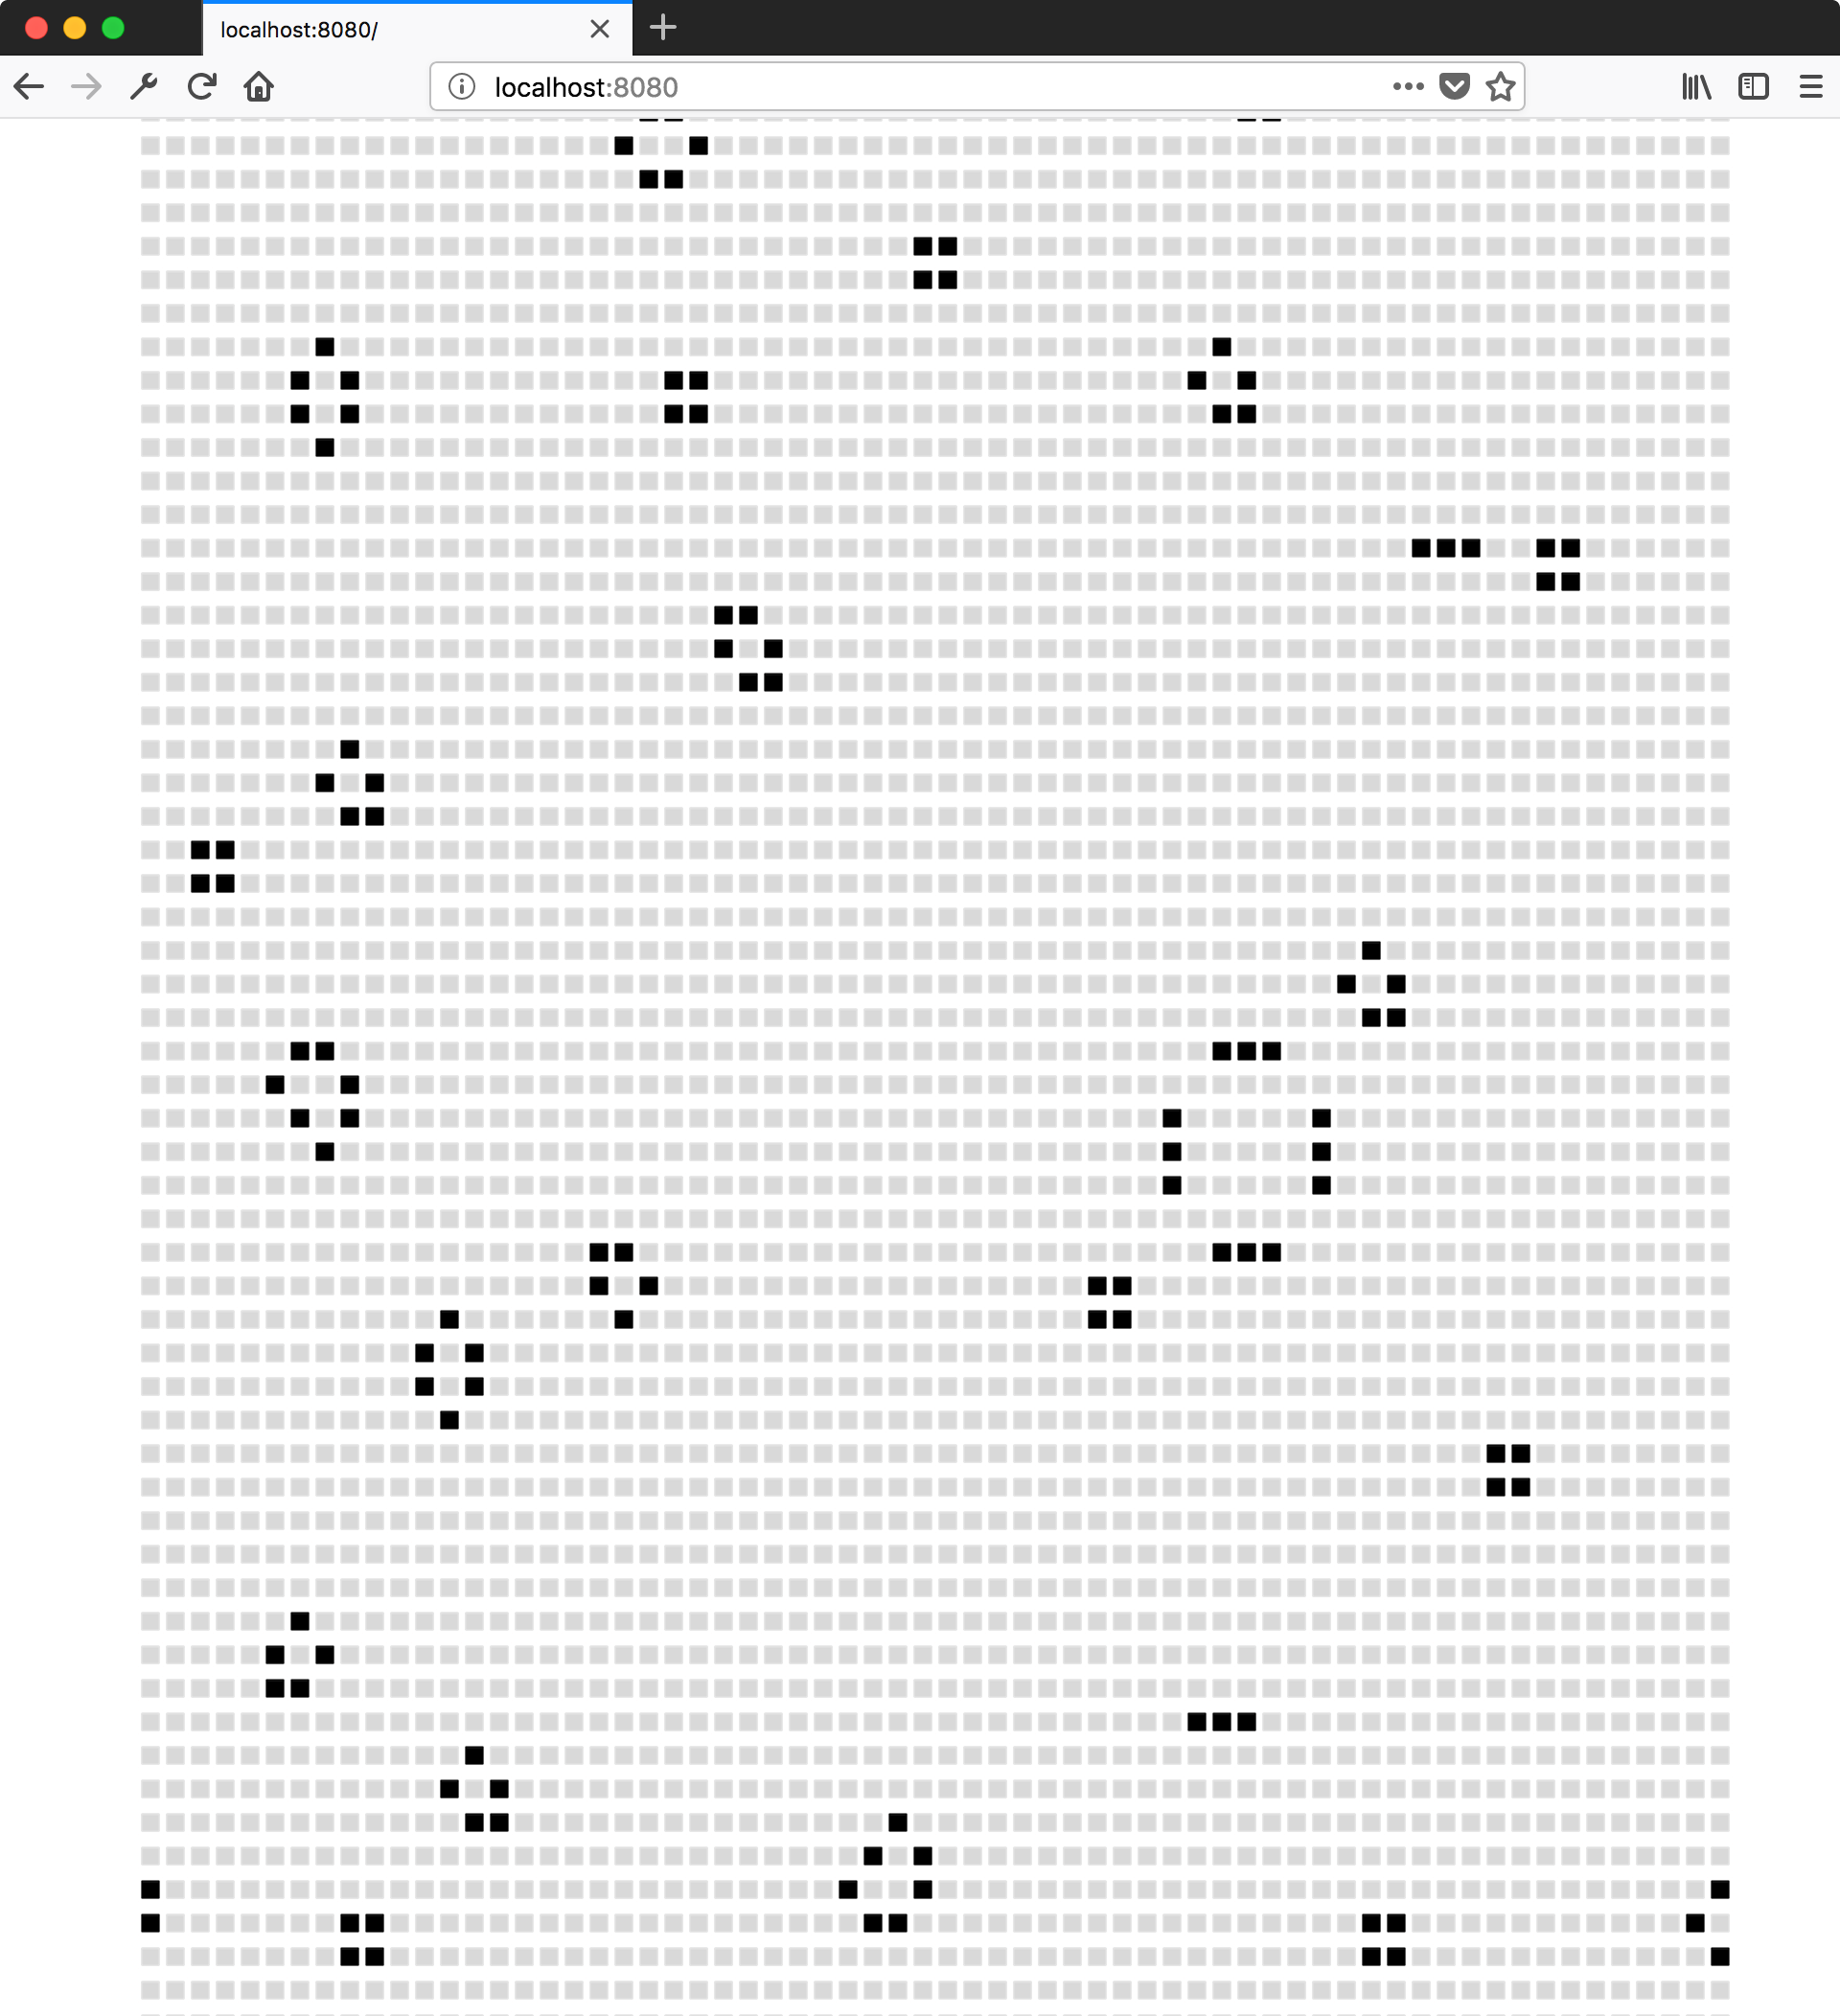
如果你重新整理 https://#:8080/,你應該會看到一個令人興奮的生命顯示器!
另外,還有一個非常棒的散列生命遊戲(hashlife)演算法,這裡有更多資訊。它使用激進的記憶功能,並且實際上可以隨著運行的時間增長而獲得指數加快的速度來計算後續的世代!考量到這點,你可能會想知道為什麼我們不在本教學中實作散列生命。這是因為散列生命超出了這篇文章的範圍,我們專注於 Rust 與 WebAssembly 整合,但我們強烈建議你進一步自行學習散列生命!
練習
-
初始化世界為單一太空船。
-
不要硬編碼初始世界,而是產生隨機世界,其中每個儲存格都有 50% 的機率存活或死亡。
提示:使用
js-syscrate 來導入Math.randomJavaScript 函式。解答
首先,於wasm-game-of-life/Cargo.toml中新增js-sys為依賴項# ... [dependencies] js-sys = "0.3" # ...接著,使用
js_sys::Math::random函式丟擲銅板# #![allow(unused_variables)] #fn main() { extern crate js_sys; // ... if js_sys::Math::random() < 0.5 { // Alive... } else { // Dead... } #} -
使用位元組表示每個儲存格,這樣可以輕鬆地遍歷儲存格,但代價是浪費記憶體。每個位元組有八個位元,但我們只需要一個位元來表示每個儲存格是存活或死亡。改造資料表示方式,讓每個儲存格只用一個位元空間。
解答
在 Rust 中,你可以使用
fixedbitsetcrate 及其FixedBitSet類型 來表示儲存格,取代Vec<Cell># #![allow(unused_variables)] #fn main() { // Make sure you also added the dependency to Cargo.toml! extern crate fixedbitset; use fixedbitset::FixedBitSet; // ... #[wasm_bindgen] pub struct Universe { width: u32, height: u32, cells: FixedBitSet, } #}Universe 建構式可以調整為以下方式
# #![allow(unused_variables)]
#fn main() {
pub fn new() -> Universe {
    let width = 64;
    let height = 64;

    let size = (width * height) as usize;
    let mut cells = FixedBitSet::with_capacity(size);

    for i in 0..size {
        cells.set(i, i % 2 == 0 || i % 7 == 0);
    }

    Universe {
        width,
        height,
        cells,
    }
}
#}
要更新世界中下一個刻度的儲存格,我們使用
FixedBitSet的set方法# #![allow(unused_variables)] #fn main() { next.set(idx, match (cell, live_neighbors) { (true, x) if x < 2 => false, (true, 2) | (true, 3) => true, (true, x) if x > 3 => false, (false, 3) => true, (otherwise, _) => otherwise }); #}要傳送指標至位元開始處給 JavaScript,可以將
FixedBitSet轉換為切片,然後將切片轉換為指標# #![allow(unused_variables)] #fn main() { #[wasm_bindgen] impl Universe { // ... pub fn cells(&self) -> *const u32 { self.cells.as_slice().as_ptr() } } #}在 JavaScript 中,由 Wasm 記憶體建構
Uint8Array與之前相同,只是陣列長度不再是width * height,而是width * height / 8,因為我們每一個位元都有儲存格,而不是每一個位元組有儲存格const cells = new Uint8Array(memory.buffer, cellsPtr, width * height / 8);給定索引和
Uint8Array,你可以使用以下函式來判斷第 nth 個位元組是否設定const bitIsSet = (n, arr) => { const byte = Math.floor(n / 8); const mask = 1 << (n % 8); return (arr[byte] & mask) === mask; };考慮到以上,新的
drawCells程式碼如下所示const drawCells = () => { const cellsPtr = universe.cells(); // This is updated! const cells = new Uint8Array(memory.buffer, cellsPtr, width * height / 8); ctx.beginPath(); for (let row = 0; row < height; row++) { for (let col = 0; col < width; col++) { const idx = getIndex(row, col); // This is updated! ctx.fillStyle = bitIsSet(idx, cells) ? ALIVE_COLOR : DEAD_COLOR; ctx.fillRect( col * (CELL_SIZE + 1) + 1, row * (CELL_SIZE + 1) + 1, CELL_SIZE, CELL_SIZE ); } } ctx.stroke(); };