實作康威的生命遊戲
設計
在開始之前,我們有一些設計選擇需要考量。
無限宇宙
生命遊戲是在無限的宇宙中遊玩,但我們沒有無限的記憶體和運算能力。解決這個十分惱人的限制通常有下列三種方法:
-
記錄有趣的事件發生在宇宙的哪個子集,並依需要擴充這個區域。在最糟的情況下,這個擴充是無限的,而實作的速度會愈來愈慢,最後用光記憶體。
-
建立一個固定大小的宇宙,其中邊緣的儲存格的鄰居比中間的儲存格少。這種方法的缺點是無限圖案,例如到達宇宙盡頭的滑板,將被扼殺。
-
建立一個固定大小的週期性宇宙,其中邊緣的儲存格有鄰居環繞到宇宙的另一邊。由於鄰居環繞在宇宙的邊緣,滑板可以一直進行下去。
我們將實作第三種選項。
Rust 和 JavaScript 的介面往來
⚡ 這個概念是理解和運用本教學課程最重要的,務必記住!
JavaScript 的垃圾收集堆積(分配物件、陣列和 DOM 節點的地方)不同於 WebAssembly 的線性記憶體空間,這是 Rust 值所在的地方。目前,WebAssembly 無法直接存取垃圾收集堆積(截至 2018 年 4 月,"介面類型" 提案 預計會改變這個狀況)。另一方面,JavaScript 能夠讀寫 WebAssembly 線性記憶體空間,但只能作為一個標量值 ArrayBuffer (u8、i32、f64 等)。WebAssembly 函數也會帶標量值作為參數並回傳標量值。這些是組成所有 WebAssembly 和 JavaScript 溝通的基本要素。
wasm_bindgen 定義如何在這個界線處理複合結構的共識。這包含 Boxing Rust 結構,將指標包覆在 JavaScript 類別中以便使用,或從 Rust 中索引 JavaScript 物件的表格。wasm_bindgen 非常方便,但它並未消除考量資料表示、哪些值和結構會透過這個界線傳遞的必要性。將它視為實作你所選擇的介面設計的工具即可。
在設計 WebAssembly 和 JavaScript 之間的介面時,我們希望能針對下列屬性進行最佳化
-
最小化進出 WebAssembly 線性記憶體的複製。不必要的複製會造成不必要的開銷。
-
最小化序列化和反序列化。與複製類似,序列化和反序列化也會耗用開銷,而且通常也會強制複製。如果我們能傳遞一個資料結構的不透明處理方式(而不是序列化在一方,將其複製到 WebAssembly 線性記憶體中的某個已知位置,再反序列化在另一方),我們通常可以大量減少開銷。
wasm_bindgen協助我們定義和使用 JavaScript 物件或 Boxing Rust 結構的不透明處理方式。
依循一般經驗法則,一個好的 JavaScript↔WebAssembly 介面設計通常會讓大規模、長生命週期的資料結構實作成存在於 WebAssembly 線性記憶體中的 Rust 型別,並以不透明處理程序式公開給 JavaScript。JavaScript 會呼叫已匯出的 WebAssembly 函數,而這些函數會帶有這些不透明處理方式,將它們的資料進行轉換、執行繁重的運算、查詢資料,然後回傳一個較小、可以複製的結果。藉由只回傳運算的較小結果,我們可以避免在 JavaScript 垃圾處理堆積和 WebAssembly 線性記憶體之間來回複制和/或序列化所有資料。
在我們的生命遊戲中連接 Rust 和 JavaScript
我們從列舉一些要避免的危害開始。我們不想在每次滴答聲中將整個宇宙複製到 WebAssembly 線性記憶體中或從中複製出來。我們不想為宇宙中的每個儲存格分配物件,我們也不想強加跨界呼叫來讀寫每個儲存格。
這讓我們如何進行?我們可以用一個平面陣列來表示宇宙,這個陣列存在於 WebAssembly 線性記憶體中,且每個儲存格有一個位元組。0 是死亡儲存格,而 1 是活的儲存格。
下面是 4 x 4 宇宙在記憶體中的樣子
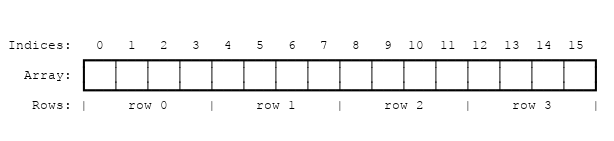
若要找出宇宙中特定列及欄位中儲存格的陣列索引,我們可以使用下列公式
index(row, column, universe) = row * width(universe) + column
我們有幾種將宇宙儲存格公開給 JavaScript 的方法。首先,我們將實作 std::fmt::Display 給予 Universe,我們可以使用此功能來產生儲存格(以文字字元呈現)的 Rust String。這個 Rust String 接著會從 WebAssembly 線性記憶體複製到 JavaScript 垃圾收集堆中的 JavaScript String,然後透過設定 HTML textContent 來顯示。本章稍後,我們會開發這個實作方式以避免複製宇宙儲存格在堆之間,並呈現到 <canvas>。
另一個可行的設計是讓 Rust 在每次滴答後傳回一列變更狀態的儲存格清單,而非將整個宇宙公開給 JavaScript。透過這種方式,JavaScript 在呈現時不需要在整個宇宙中進行反覆運算,而只針對相關子集。但折衷點是這種基於變更的設計實作上會稍微困難一些。
Rust 實作
在上一章,我們複製了一個初始專案範本。我們現在將修改那個專案範本。
我們從移除 wasm-game-of-life/src/lib.rs 中的 alert 匯入和 greet 函式開始,並以儲存格的類型定義取代它們
# #![allow(unused_variables)]
#fn main() {
#[wasm_bindgen]
#[repr(u8)]
#[derive(Clone, Copy, Debug, PartialEq, Eq)]
pub enum Cell {
    Dead = 0,
    Alive = 1,
}
#}
我們要有 #[repr(u8)] 很重要,原因是每個儲存格都以單一位元組表示。Dead 變異是 0,而 Alive 變異是 1 也很重要,因此我們可以用加法方式來輕鬆計算儲存格的生命鄰居數量。
接下來,我們來定義宇宙。宇宙有寬度和高度,以及長度為 寬度 * 高度 的儲存格向量。
# #![allow(unused_variables)]
#fn main() {
#[wasm_bindgen]
pub struct Universe {
    width: u32,
    height: u32,
    cells: Vec<Cell>,
}
#}
若要存取特定列及欄位的儲存格,我們會像前述般將列和欄位轉換為儲存格向量的索引
# #![allow(unused_variables)]
#fn main() {
impl Universe {
    fn get_index(&self, row: u32, column: u32) -> usize {
        (row * self.width + column) as usize
    }

    // ...
}
#}
為了計算儲存格的下一狀態,我們需要取得它的鄰居中有多少個還活著。讓我們寫一個 live_neighbor_count 方法來做到這點!
# #![allow(unused_variables)]
#fn main() {
impl Universe {
    // ...

    fn live_neighbor_count(&self, row: u32, column: u32) -> u8 {
        let mut count = 0;
        for delta_row in [self.height - 1, 0, 1].iter().cloned() {
            for delta_col in [self.width - 1, 0, 1].iter().cloned() {
                if delta_row == 0 && delta_col == 0 {
                    continue;
                }

                let neighbor_row = (row + delta_row) % self.height;
                let neighbor_col = (column + delta_col) % self.width;
                let idx = self.get_index(neighbor_row, neighbor_col);
                count += self.cells[idx] as u8;
            }
        }
        count
    }
}
#}
live_neighbor_count 方法會使用 delta 值和模數,以避免透過 if 來特別處理宇宙邊緣。套用 -1 的 delta 值時,我們會新增 self.height - 1,並讓模數運算發揮作用,而不是嘗試減去 1。row 和 column 可以是 0,而如果我們嘗試從中減去 1,就會發生無符號整數的下溢。
現在我們擁有了所有從目前的世代運算出下一代所需的一切!遊戲的每條規則都遵循將條件轉換成 match 表達式的直譯。另外,由於我們希望使用 JavaScript 控制時鐘事件,因此我們會將此方法放在 #[wasm_bindgen] 函式區塊中,以便 JavaScript 可以呼叫它。
# #![allow(unused_variables)]
#fn main() {
/// Public methods, exported to JavaScript.
#[wasm_bindgen]
impl Universe {
    pub fn tick(&mut self) {
        let mut next = self.cells.clone();

        for row in 0..self.height {
            for col in 0..self.width {
                let idx = self.get_index(row, col);
                let cell = self.cells[idx];
                let live_neighbors = self.live_neighbor_count(row, col);

                let next_cell = match (cell, live_neighbors) {
                    // Rule 1: Any live cell with fewer than two live neighbours
                    // dies, as if caused by underpopulation.
                    (Cell::Alive, x) if x < 2 => Cell::Dead,
                    // Rule 2: Any live cell with two or three live neighbours
                    // lives on to the next generation.
                    (Cell::Alive, 2) | (Cell::Alive, 3) => Cell::Alive,
                    // Rule 3: Any live cell with more than three live
                    // neighbours dies, as if by overpopulation.
                    (Cell::Alive, x) if x > 3 => Cell::Dead,
                    // Rule 4: Any dead cell with exactly three live neighbours
                    // becomes a live cell, as if by reproduction.
                    (Cell::Dead, 3) => Cell::Alive,
                    // All other cells remain in the same state.
                    (otherwise, _) => otherwise,
                };

                next[idx] = next_cell;
            }
        }

        self.cells = next;
    }

    // ...
}
#}
到目前為止,宇宙的狀態會表示成一個儲存格向量。為了讓人看得懂,讓我們實作一個基本的文字顯示器。這個概念是要以下列格式逐行將宇宙寫成文字,並針對每個活著的儲存格列印 Unicode 字元 ◼(「黑色中實方塊」)。對於已死亡的儲存格,我們會列印 ◻(「白色中實方塊」)。
透過實作 Rust 標準函式庫中的 Display 特質,我們可以新增一種方式,用使用者友善的形式格式化結構。這也會自動為我們提供 to_string 方法。
# #![allow(unused_variables)]
#fn main() {
use std::fmt;

impl fmt::Display for Universe {
    fn fmt(&self, f: &mut fmt::Formatter) -> fmt::Result {
        for line in self.cells.as_slice().chunks(self.width as usize) {
            for &cell in line {
                let symbol = if cell == Cell::Dead { '◻' } else { '◼' };
                write!(f, "{}", symbol)?;
            }
            write!(f, "\n")?;
        }

        Ok(())
    }
}
#}
最後,我們會定義一個建構函式,用一個有趣的生活與死亡儲存格模式初始化宇宙,並定義一個 render 方法
# #![allow(unused_variables)]
#fn main() {
/// Public methods, exported to JavaScript.
#[wasm_bindgen]
impl Universe {
    // ...

    pub fn new() -> Universe {
        let width = 64;
        let height = 64;

        let cells = (0..width * height)
            .map(|i| {
                if i % 2 == 0 || i % 7 == 0 {
                    Cell::Alive
                } else {
                    Cell::Dead
                }
            })
            .collect();

        Universe {
            width,
            height,
            cells,
        }
    }

    pub fn render(&self) -> String {
        self.to_string()
    }
}
#}
有了它,生命遊戲 Rust 的那一半實作就完成了!
在 wasm-game-of-life 目錄中執行 wasm-pack build,將它重新編譯成 WebAssembly。
使用 JavaScript 顯示
首先,讓我們將一個 <pre> 元素新增至 wasm-game-of-life/www/index.html,以用來顯示宇宙,放 <script> 標籤的正上方。
<body>
  <pre id="game-of-life-canvas"></pre>
  <script src="./bootstrap.js"></script>
</body>
此外,我們希望那個 <pre> 置中在網頁中間。我們可以使用 CSS Flex 盒子來達成這個任務。在 wasm-game-of-life/www/index.html 的 <head> 中,新增以下 <style> 標籤:
<style>
  body {
    position: absolute;
    top: 0;
    left: 0;
    width: 100%;
    height: 100%;
    display: flex;
    flex-direction: column;
    align-items: center;
    justify-content: center;
  }
</style>
在 wasm-game-of-life/www/index.js 的頂端,讓我們修正我們的 import,將 Universe 引入,而不是舊有的 greet 函式
import { Universe } from "wasm-game-of-life";
此外,讓我們取得剛才新增的 <pre> 元素,並實體化一個新的宇宙
const pre = document.getElementById("game-of-life-canvas");
const universe = Universe.new();
JavaScript 會在 requestAnimationFrame 迴圈 中執行。它會在每次反覆時,將目前的宇宙繪製到 <pre>,然後呼叫 Universe::tick。
const renderLoop = () => {
  pre.textContent = universe.render();
  universe.tick();

  requestAnimationFrame(renderLoop);
};
要開始顯示程序,我們只需要進行最初的呼叫,開始顯示迴圈的第一個反覆
requestAnimationFrame(renderLoop);
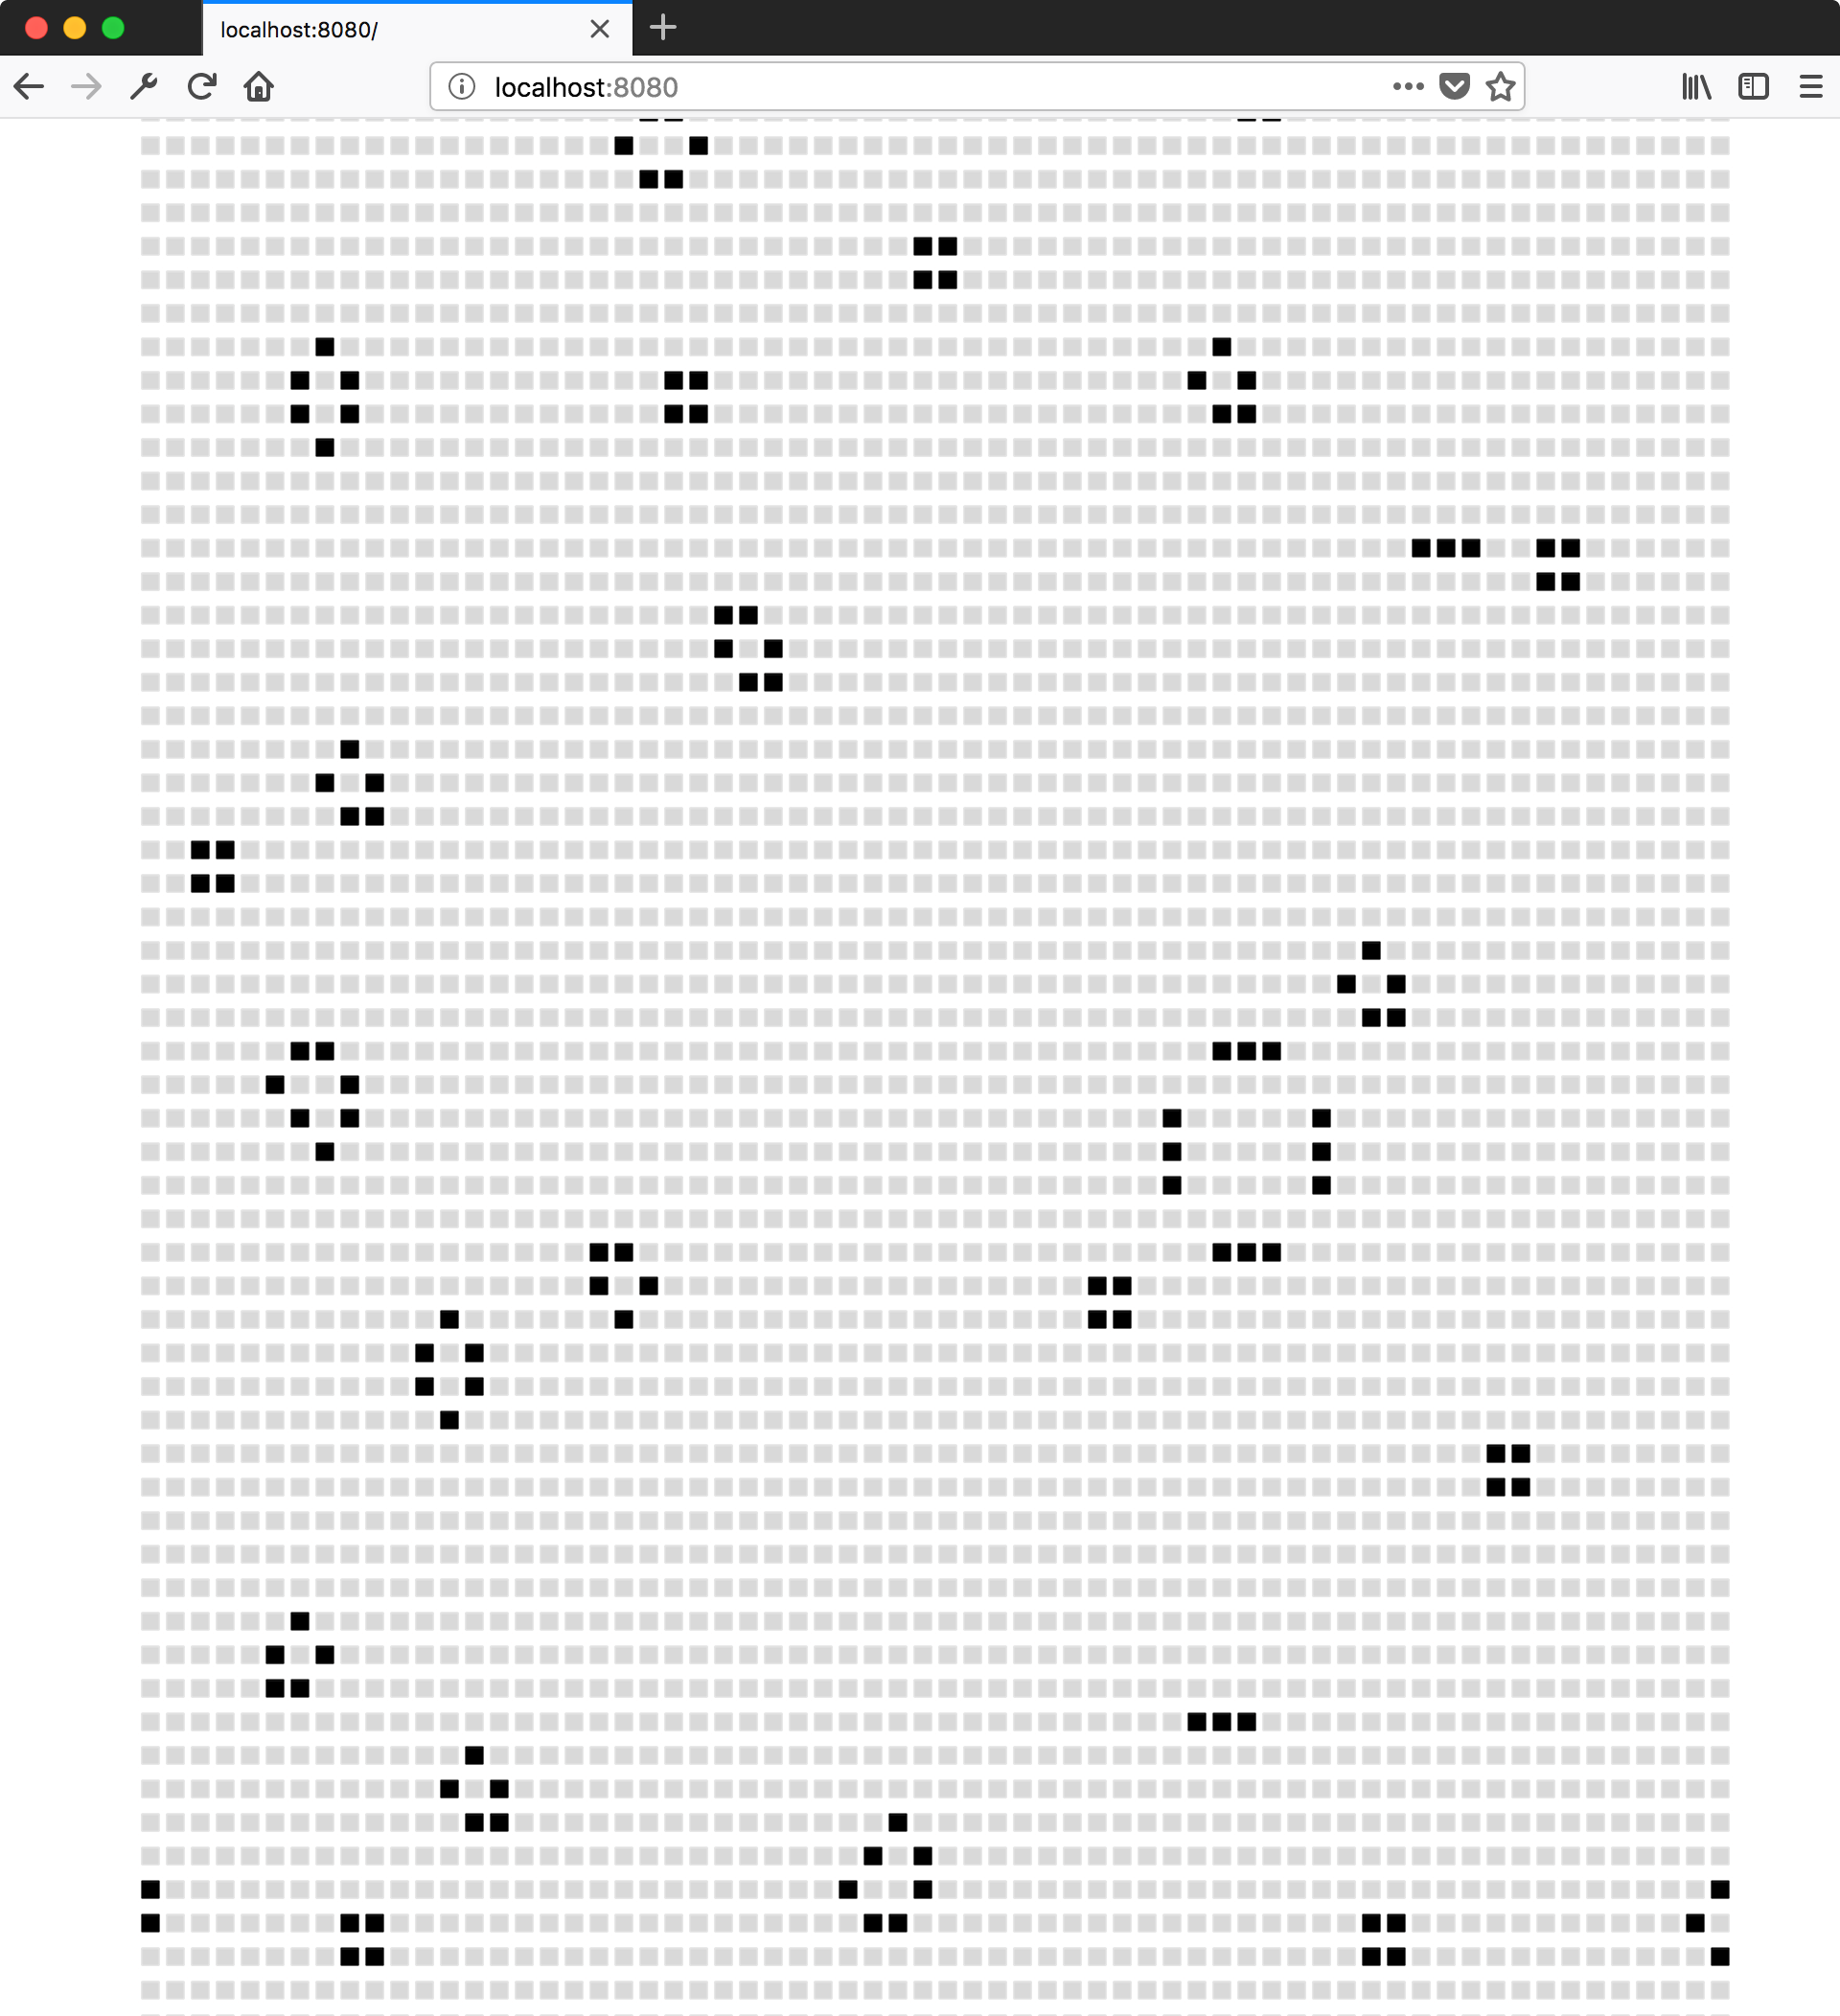
請確定您的開發人員伺服器仍然在執行中(在 wasm-game-of-life/www 中執行 npm run start),而 https://#:8080/ 應如下所示
直接從記憶體顯示至畫布
在 Rust 中產生(並配置)String,然後讓 wasm-bindgen 將其轉換為有效的 JavaScript 字串,會導致 universe 儲存格的不必要複製。由於 JavaScript 代碼已經知道 universe 的寬度和高度,並能夠直接讀取構成儲存格的 WebAssembly 線性記憶體,我們會修改 render 方法以傳回 universe 陣列開始處的指標。
此外,我們會改用 Canvas API,而不是呈現 Unicode 文字。我們會在教學課程的其餘部分使用這個設計。
在 wasm-game-of-life/www/index.html 內,我們使用 <canvas> 取代前面新增的 <pre>,我們會對其進行渲染(它也應該位於 <body> 內,在載入我們的 JavaScript 的 <script> 之前)
<body>
  <canvas id="game-of-life-canvas"></canvas>
  <script src='./bootstrap.js'></script>
</body>
為了從 Rust 實作取得必要的資訊,我們需要為 universe 的寬度、高度和儲存格陣列指標,再新增一些 getter 函式。所有這些也都公開給 JavaScript。對 wasm-game-of-life/src/lib.rs 進行這些新增。
# #![allow(unused_variables)]
#fn main() {
/// Public methods, exported to JavaScript.
#[wasm_bindgen]
impl Universe {
    // ...

    pub fn width(&self) -> u32 {
        self.width
    }

    pub fn height(&self) -> u32 {
        self.height
    }

    pub fn cells(&self) -> *const Cell {
        self.cells.as_ptr()
    }
}
#}
接下來,在 wasm-game-of-life/www/index.js 內,我們也從 wasm-game-of-life 中匯入 Cell,並定義一些常數,這些常數會在呈現在畫布上時使用
import { Universe, Cell } from "wasm-game-of-life";

const CELL_SIZE = 5; // px
const GRID_COLOR = "#CCCCCC";
const DEAD_COLOR = "#FFFFFF";
const ALIVE_COLOR = "#000000";
現在,我們重新編寫這段剩下的 JavaScript 代碼,不再寫入 <pre> 的 textContent,而是繪製到 <canvas>
// Construct the universe, and get its width and height.
const universe = Universe.new();
const width = universe.width();
const height = universe.height();

// Give the canvas room for all of our cells and a 1px border
// around each of them.
const canvas = document.getElementById("game-of-life-canvas");
canvas.height = (CELL_SIZE + 1) * height + 1;
canvas.width = (CELL_SIZE + 1) * width + 1;

const ctx = canvas.getContext('2d');

const renderLoop = () => {
  universe.tick();

  drawGrid();
  drawCells();

  requestAnimationFrame(renderLoop);
};
若要繪製儲存格之間的格線,我們繪製一組等距的水平線和一組等距的垂直線。這些線相互交叉,形成格線。
const drawGrid = () => {
  ctx.beginPath();
  ctx.strokeStyle = GRID_COLOR;

  // Vertical lines.
  for (let i = 0; i <= width; i++) {
    ctx.moveTo(i * (CELL_SIZE + 1) + 1, 0);
    ctx.lineTo(i * (CELL_SIZE + 1) + 1, (CELL_SIZE + 1) * height + 1);
  }

  // Horizontal lines.
  for (let j = 0; j <= height; j++) {
    ctx.moveTo(0,                           j * (CELL_SIZE + 1) + 1);
    ctx.lineTo((CELL_SIZE + 1) * width + 1, j * (CELL_SIZE + 1) + 1);
  }

  ctx.stroke();
};
我們可以透過 memory 直接存取 WebAssembly 的線性記憶體,這是 raw wasm 模組 wasm_game_of_life_bg 中定義的。為了繪製儲存格,我們取得指向 universe 儲存格的指標,建構覆蓋儲存格緩衝區的 Uint8Array,逐一對每個儲存格進行迭代,並根據儲存格是死是活,繪製白或黑色矩形。透過處理指標和覆蓋,我們避免在每次滴答中跨過邊界複製儲存格。
// Import the WebAssembly memory at the top of the file.
import { memory } from "wasm-game-of-life/wasm_game_of_life_bg";

// ...

const getIndex = (row, column) => {
  return row * width + column;
};

const drawCells = () => {
  const cellsPtr = universe.cells();
  const cells = new Uint8Array(memory.buffer, cellsPtr, width * height);

  ctx.beginPath();

  for (let row = 0; row < height; row++) {
    for (let col = 0; col < width; col++) {
      const idx = getIndex(row, col);

      ctx.fillStyle = cells[idx] === Cell.Dead
        ? DEAD_COLOR
        : ALIVE_COLOR;

      ctx.fillRect(
        col * (CELL_SIZE + 1) + 1,
        row * (CELL_SIZE + 1) + 1,
        CELL_SIZE,
        CELL_SIZE
      );
    }
  }

  ctx.stroke();
};
為了開始渲染程序,我們會使用上述相同的代碼開始渲染迴圈的第一次迭代
drawGrid();
drawCells();
requestAnimationFrame(renderLoop);
請注意,我們在此呼叫 drawGrid() 和 drawCells() 在 呼叫 requestAnimationFrame() 之前。我們這樣做的原因是,在進行變更之前,先繪製 universe 的初始狀態。如果我們改為單純呼叫 requestAnimationFrame(renderLoop),我們將會遇到這樣的情況:實際繪製的第一個畫面會在首次呼叫 universe.tick() 之後,而 universe.tick() 是這些儲存格生命的第二次「滴答」。
成功了!
從根目錄 wasm-game-of-life 目錄中執行此指令,重新建構 WebAssembly 和繫結膠水
wasm-pack build
確認開發伺服器仍然在執行中。如果沒有,從 wasm-game-of-life/www 目錄中再次啟動
npm run start
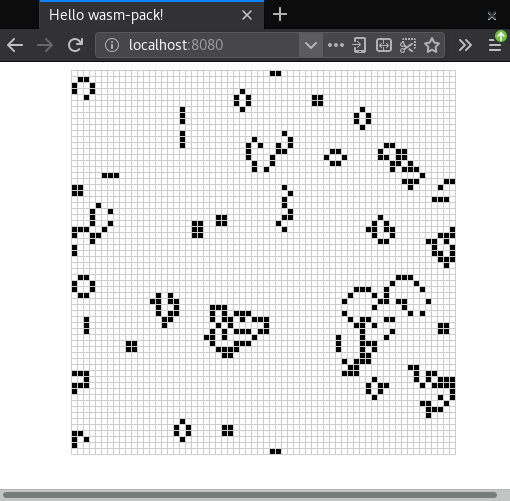
如果您重新整理 https://#:8080/,您應該會看到令人興奮的生命展示!
補充說明,還有一種非常棒的演算法可實作「康威生命遊戲」,稱為 散列生命。它使用激進的記憶,而且實際上可以隨著執行越久而使計算未來世代的速度呈指數增加!因此,您可能會想,為什麼我們不在本教學課程中實作散列生命。它超出了本文範圍,因為我們專注於 Rust 和 WebAssembly 的整合,但我們非常鼓勵您自己去了解散列生命!
練習
-
使用單一太空船初始化世界。
-
不要對初始世界進行硬編碼,請隨機產生一個,其中每個細胞都有 50% 的機率是生或死。
提示:使用
js-syscrate 匯入Math.randomJavaScript 函式。解答
首先,在wasm-game-of-life/Cargo.toml中將js-sys加入為相依性。# ... [dependencies] js-sys = "0.3" # ...然後,使用
js_sys::Math::random函式拋硬幣# #![allow(unused_variables)] #fn main() { extern crate js_sys; // ... if js_sys::Math::random() < 0.5 { // Alive... } else { // Dead... } #} -
用一個位元組來表示每個細胞,讓迭代變得很容易,但代價是浪費記憶體。每個位元組有八個位元,但我們只需要一個位元就可以表示每個細胞是生還是死。重構資料表示,使得每個細胞只使用一個位元格的空間。
解答
在 Rust 中,您可以使用
fixedbitsetcrate 和它的FixedBitSet類型 來表示細胞,而不是Vec<Cell># #![allow(unused_variables)] #fn main() { // Make sure you also added the dependency to Cargo.toml! extern crate fixedbitset; use fixedbitset::FixedBitSet; // ... #[wasm_bindgen] pub struct Universe { width: u32, height: u32, cells: FixedBitSet, } #}Universe 建構函式可以進行以下調整
# #![allow(unused_variables)]
#fn main() {
pub fn new() -> Universe {
    let width = 64;
    let height = 64;

    let size = (width * height) as usize;
    let mut cells = FixedBitSet::with_capacity(size);

    for i in 0..size {
        cells.set(i, i % 2 == 0 || i % 7 == 0);
    }

    Universe {
        width,
        height,
        cells,
    }
}
#}
若要更新世界下次更新時的細胞,我們使用
FixedBitSet的set方法# #![allow(unused_variables)] #fn main() { next.set(idx, match (cell, live_neighbors) { (true, x) if x < 2 => false, (true, 2) | (true, 3) => true, (true, x) if x > 3 => false, (false, 3) => true, (otherwise, _) => otherwise }); #}若要將指標傳遞至 JavaScript 的位元開始處,您可以將
FixedBitSet轉換成片段,然後將片段轉換成指標# #![allow(unused_variables)] #fn main() { #[wasm_bindgen] impl Universe { // ... pub fn cells(&self) -> *const u32 { self.cells.as_slice().as_ptr() } } #}在 JavaScript 中,從 Wasm 記憶體建構
Uint8Array與之前相同,只不過陣列長度不再是width * height,而是width * height / 8,因為我們每一個位元有一個細胞,而不是每一個位元組有一個細胞const cells = new Uint8Array(memory.buffer, cellsPtr, width * height / 8);給定一個索引值和
Uint8Array,您可以使用以下函式判斷是否設定第 nth 位元const bitIsSet = (n, arr) => { const byte = Math.floor(n / 8); const mask = 1 << (n % 8); return (arr[byte] & mask) === mask; };在所有這些的前提下,
drawCells的新版本如下所示const drawCells = () => { const cellsPtr = universe.cells(); // This is updated! const cells = new Uint8Array(memory.buffer, cellsPtr, width * height / 8); ctx.beginPath(); for (let row = 0; row < height; row++) { for (let col = 0; col < width; col++) { const idx = getIndex(row, col); // This is updated! ctx.fillStyle = bitIsSet(idx, cells) ? ALIVE_COLOR : DEAD_COLOR; ctx.fillRect( col * (CELL_SIZE + 1) + 1, row * (CELL_SIZE + 1) + 1, CELL_SIZE, CELL_SIZE ); } } ctx.stroke(); };